I got an Honorable Mention in this year’s Awagami International Miniprint exhibition! Well me and about a hundred or so other people. But hey, it’s better than not!
I’m done with the first series of prints! I started out with 14 on Shin Torinoko (sized, Manila linen and acid free pine pulp, machine made) and 9 on Echizen Kozo (sized, kozo with “a small % of acid free pulp”, handmade) and of course I had some attrition. Only one bone-headed move printing a sheet 180 degrees from the correct angle; some places where the paper contacted a part of the block that was too high; and a few “too crude” impressions with some movement or just too much pigment and goo. I think I have ended up with 10 + 6 prints I can be happy with (perhaps after cleaning up a few spots around the edge that I wish were not there). Aside from the bone-headedness, I can solve most of the errors by deepening my carving.
The Shin Torinoko held up much better under the pressure and friction of the baren than the Echizen Kozo did. I mostly didn’t use protecting sheets (baking parchment) until the end, because I have found that it’s easier to feel what is going on without them. Consequently there were places on the handmade paper that had a lot of wear.
Back-side condition of one of the Echizen Kozo prints
Echizen Kozo on the left, Shin Torinoko on the right.
The Shin Torinoko held up comparatively well. It is just as thick and cushy to print on, but I guess some are suspicious of its pulp content and fear it won’t last as long. Here is a square-on shot of both back-sides, handmade paper on the left:
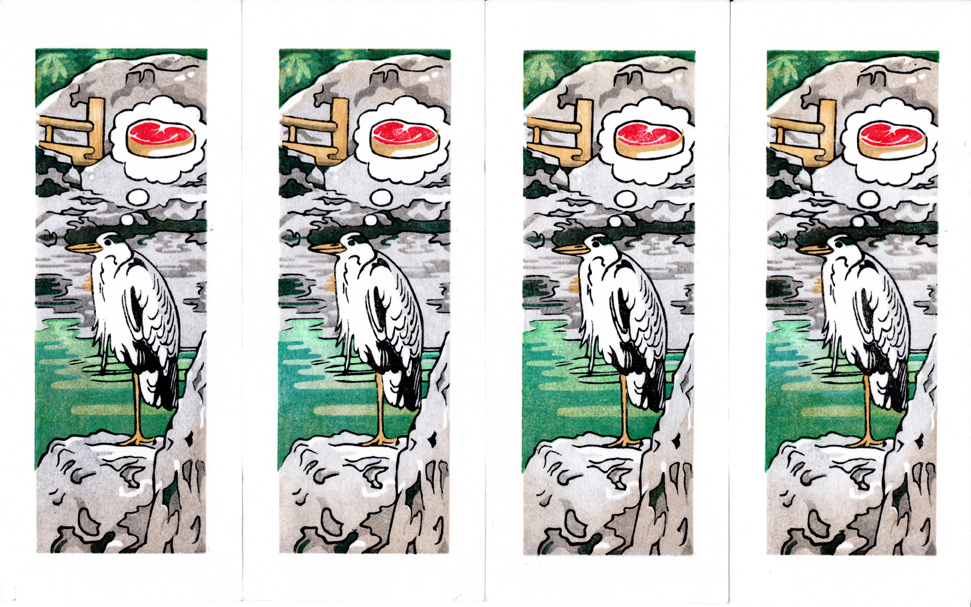
So you probably want to see what the final prints look like. First, here are a few of the Shin Torinoko prints, followed by a set of their brothers on handmade, Echizen Kozo paper. I was aiming for uniformity, and I think the bottom row was more successful than the top.
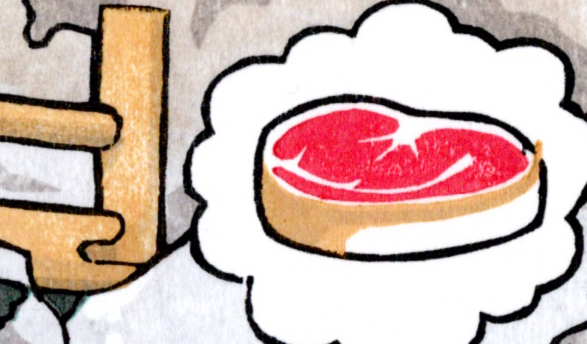
…. and a few details:
The left is on the handmade paper, and the right is on the machine-made. Both reveal a problem in my printing: I printed the key block last, and I used some pretty serious pressure in the earliest impressions — like the first one, in yellow. See how the yellow intrudes on the bottom line of the steak, and interrupts the upper right corner? This is not because there is a flaw in the key block — it’s because the paper is soft and squishy, and the yellow compressed it so much that the key block can’t get a complete impression! There are signs of this on the left, too, in the unevenness of the outline of the leg, and in the intrusion of the deep blue green into the mostly vertical outline of the rightmost stone. I almost want to blame the paper — I feel like strong pressure is needed to get a smooth, complete impression, so maybe a paper that is less yielding would give a better result.
Here are the impressions, in order. There are 6 blocks total:
Yellow Ochre (block 1)
Permanent red deep (block 2)
Emerald green (block 2)
Dark gray 1 (dilute sumi) (block 3)
Light gray (neutral tint) (block 4)
Cobalt turquoise (block 5)
Brown + sumi + a little permanent red on the waterline and the rocks immediately above and their reflection (block 5)
Another round of dark gray (dilute sumi) on the handmade paper and some of the others, because they were too pale (block 3)
Olive green (bokashi on the water, complete impression on vegetation) (block 2)
Key block (block 6)
Mystery pale brown bokashi on top and bottom (block 4)
I want to enter this print in the upcoming Awagami Mini Print 2019 Exhibition, so now I need to do it all again on A4 paper.
This heron is pretty tired of having fish every day.
I’m actually printing the first few colors now, but will need to do some more testing of the final layers. The steak looks best in the one on the left, after I got rid of the line defining the front edge of the upper surface. The yellow is too saturated on the rightmost image and too light on the third; the water looks best on the second; and I like the like brown bokashi in the third image on the topmost and foreground rocks. The blue is required for the water but not working for the rock shadows in the foreground, at the water line and under the bridge. That’s the main experiment that needs to be done!